Create and Connect Azure SQL database in the Azure portal


Introduction

This article explains how to create and connect Azure SQL database in the Azure portal.

SQL database

First, we need to log into the Azure Portal with our Azure credentials. Then we need to create an Azure SQL database in the Azure portal.

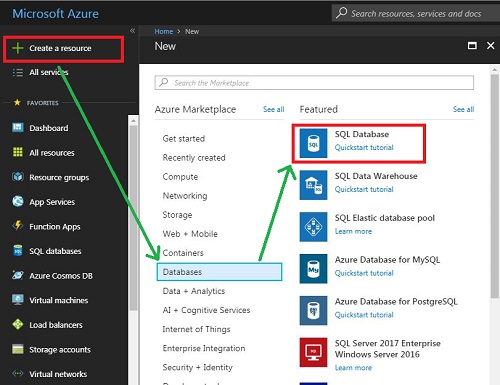
Click on “Create a resource” on the left side menu and it will open an “Azure Marketplace”. There, we can see the list of services. Click “Databases” then click on the “SQL Database”.

SQL database

SQL database

Create a SQL database

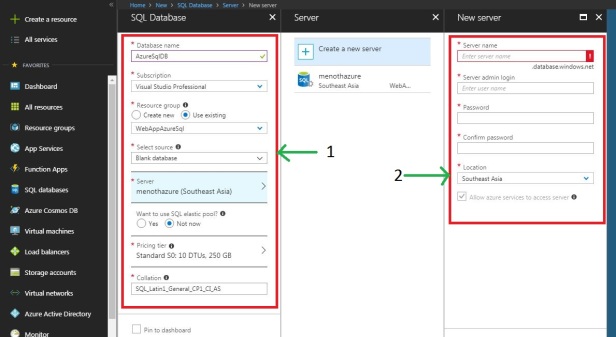
After clicking the “SQL Database”, it will open another section. There, we need to provide the basic information about our database like Database name, Storage Space, Server name, etc.

Database Creation

Database Creation

Database name : The valid name of our SQL Database ( We have given the Database name as “AzureSQLDB” ).

Subscription : We can select our Azure subscription for SQL Database creation.

Resource group : We can create a new resource group or choose from an existing one ( We have selected our existing resource group as “WebAppAzureSql” ).

Select source : We select Blank database ( This will create a blank database ). The following Select source categories are available in the SQL Database.

  1. Blank database – This will create a blank database.
  2. AdventureWorksLT This will generate an AdventureWorksLT sample schema.
  3. Backup : Create a new database from an existing backup.

Server

Under the server, we need to configure required settings.

  1. Server name : Any globally unique name we can give which will store our database information.
  2. Server admin login : Create our server admin name for future access.
  3. Password & Confirm Password : Create our server admin password for future access.
  4. Location : Choose an available location that will be more suitable for our requirement.

Once we enter all the “Server” details then Click on “Select”.

Pricing tier : Select an appropriate pricing tier for our requirement.

Collation : Create a name for the Collation (Collation defines the rules that sort and compare the data and cannot be changed after the database creation ).

Click on “Create” to provision the database.

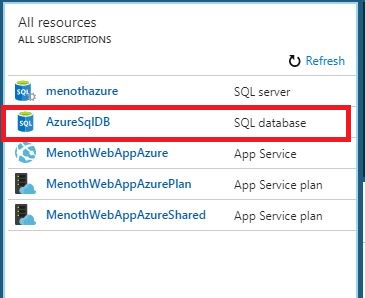
Database provisioned successfully!! Go to the Dashboard and Click on the Sql Database ( “AzureSqlDB” ).

DashBoard

DashBoard

Now open the details page of SQL database ( “Overview” ). Here, we can see the Server name and other created details. We can access the SQL Database through this Server name in Azure Portal & Local MSSQL.

Create a server-level firewall rule

We need to setup a firewall rule for accessing our Azure Sql database in Azure Portal. So the SQL Database service creates a firewall at the server-level that prevents external applications and tools from connecting to the server. If we not set up any firewall rule in Azure SQL database portal, then we will get the following error.

Setup Firewall Rule

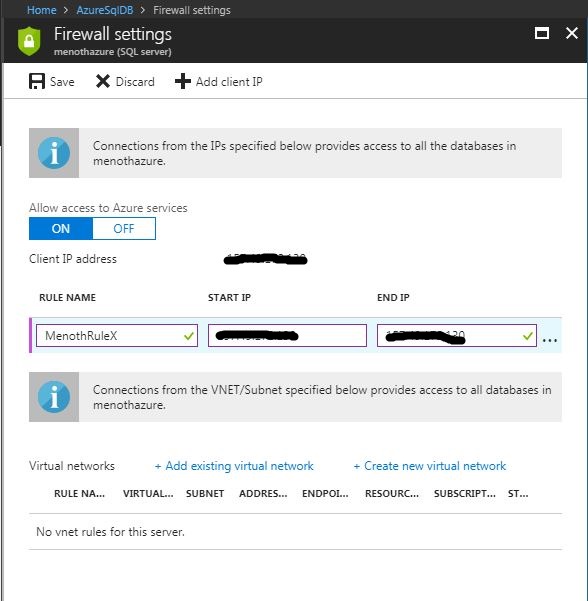
Click on the “Set server Firewall” in the Overview Section.

The “Client IP address” automatically fetched into the Firewall Setting. We just copy the IP Address and Add the START IP & END IP Section (This will add based on more than one IP address ). Set a “RULE NAME” of our Firewall. Once it’s all done then the information saves automatically into the firewall rule section.

SQL Database Login in Azure Portal

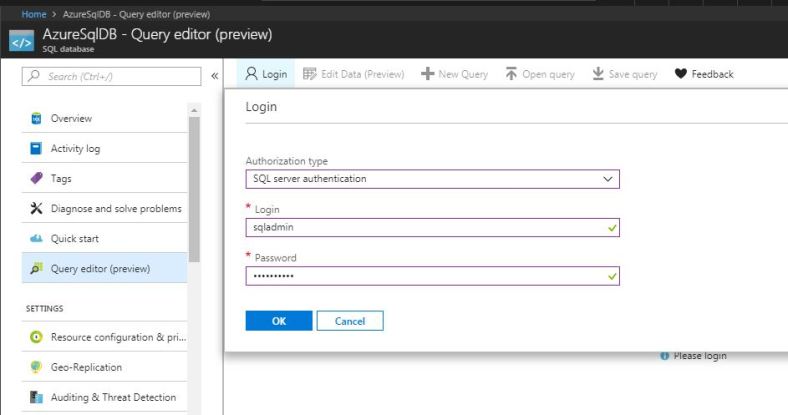
Click on the “Query editor ( preview)” and Click on the “Login” and it will display a Login portal for accessing our Azure SQL Database in Azure. So give or appropriate database credential into it. Once it’s done Click on “OK” button.

Output 1

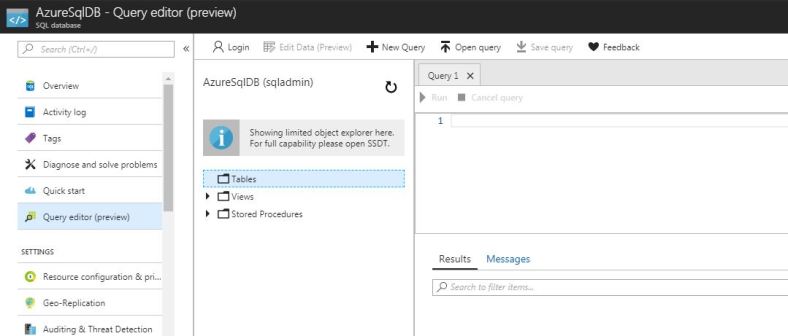
It will open our Azure Sql Database Query Editor window with Database details.

Output 2

Accessing through our Local “Microsoft SQL Server Management Studio”.

Reference

See Also

You can download other ASP.NET Core & Azure source codes from MSDN Code, using the link, mentioned below.

Summary

In this article, we are going to create and connect Azure SQL database to the Azure portal. I hope this article is useful for all Azure beginners & experts.
Ranking Function in Microsoft SQL Server


Introduction

In this article, I will explain the use of the Ranking function in Microsoft SQL Server. In common use, Rank shows the position and courage of a person in a real life scenario. So here, I will also give some examples related to all Ranking functions in Microsoft SQL Server.

Table In Microsoft SQL Server

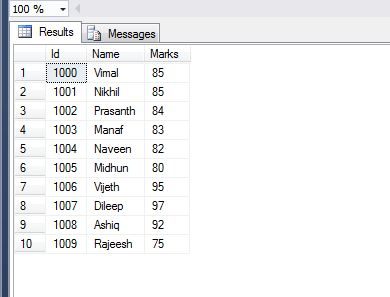
My table contains bulk amount of data and it’s related to student marks list. So, I am going to apply Microsoft SQL Server Ranking function in the following Table “Table_MarkList”.

Ranking Function

Ranking Function Main Table

Sql Query

USE [Test]
GO
/****** Object:  Table [dbo].[Table_MarkList]    Script Date: 08/03/2016 12:06:32 ******/
SET ANSI_NULLS ON
GO
SET QUOTED_IDENTIFIER ON
GO
SET ANSI_PADDING ON
GO
CREATE TABLE [dbo].[Table_MarkList](
	[Id] [int] IDENTITY(1000,1) NOT NULL,
	[Name] [varchar](50) NULL,
	[Marks] [int] NULL
) ON [PRIMARY]
GO
SET ANSI_PADDING OFF
GO
SET IDENTITY_INSERT [dbo].[Table_MarkList] ON
INSERT [dbo].[Table_MarkList] ([Id], [Name], [Marks]) VALUES (1000, N'Vimal', 85)
INSERT [dbo].[Table_MarkList] ([Id], [Name], [Marks]) VALUES (1001, N'Nikhil', 85)
INSERT [dbo].[Table_MarkList] ([Id], [Name], [Marks]) VALUES (1002, N'Prasanth', 84)
INSERT [dbo].[Table_MarkList] ([Id], [Name], [Marks]) VALUES (1003, N'Manaf', 83)
INSERT [dbo].[Table_MarkList] ([Id], [Name], [Marks]) VALUES (1004, N'Naveen', 82)
INSERT [dbo].[Table_MarkList] ([Id], [Name], [Marks]) VALUES (1005, N'Midhun', 80)
INSERT [dbo].[Table_MarkList] ([Id], [Name], [Marks]) VALUES (1006, N'Vijeth', 95)
INSERT [dbo].[Table_MarkList] ([Id], [Name], [Marks]) VALUES (1007, N'Dileep', 97)
INSERT [dbo].[Table_MarkList] ([Id], [Name], [Marks]) VALUES (1008, N'Ashiq', 92)
INSERT [dbo].[Table_MarkList] ([Id], [Name], [Marks]) VALUES (1009, N'Rajeesh', 75)
SET IDENTITY_INSERT [dbo].[Table_MarkList] OFF

Ranking Function in Microsoft SQL Server

The following are the Ranking functions in Microsoft SQL Server.

  • RANK()
  • DENSE_RANK()
  • Row_Number()
  • NTILE()

RANK()

One of the important Ranking functions in Microsoft SQL Server is RANK(). Rank() Ranking functions are non deterministic and return a ranking value for each row in a partition. Some rows return same rank as other rows, depending on the same values in columns.

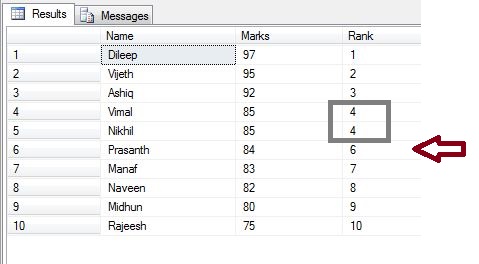
The following result will be displayed after the RANK() function is applied in “Table_MarkList”. So, the RANK() function is sorting the mark’s column values in descending order, in the following table. The Rank() function will apply the same rank for common values in the table. The following table contains the same marks for “Vimal” & “Nikhil” and after applying Rank() function, it shows both of them with the same rank as “4”. So, the next rank will show as “6” because internally it counts one 4 as 5.  

Rank Function

RANK() Function Sql Query

select Name,Marks, RANK() over(order by Marks desc) As 'Rank' From dbo.Table_MarkList

DENSE_RANK()

Another important Ranking function in Microsoft SQL Server is DENSE_RANK(). It differs from RANK() function and it also returns the same rank as other rows, depending on the same values in columns. If the same rank happens, then the next rank will be +1 added to the last rank.

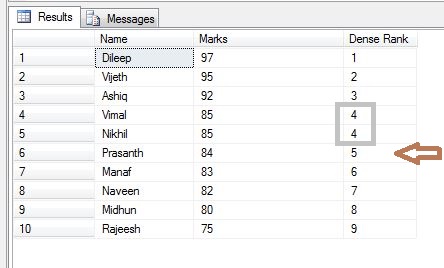
The DENSE_RANK() function sorts the Marks column values in descending order in the following table “Table_MarkList”. The DENSE_RANK() function will apply the same rank for common values in the table “Table_MarkList”. So, the following table contains same marks for “Vimal” & “Nikhil”, after applying DENSE_RANK() function, it has assigned these both the same rank as “4”. So, the next rank will start from “5”. It will maintain the rank order of the RANK() function.

Dense Rank In MSSQL

Dense Rank In MSSQL

DENSE_RANK() Function Sql Query

 select Name,Marks, DENSE_RANK() over(order by Marks desc) As 'Dense Rank' From dbo.Table_MarkList 

Row_Number()

One of the important Ranking functions in Microsoft SQL Server is Row_Number(). We can use this Ranking function for pagination purposes.

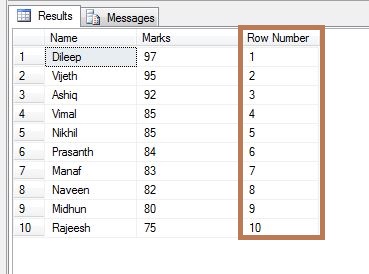
The Row_Number() function is sorting the Marks column values in descending order in the following table “Table_MarkList”. The Row_Number() function will apply the same rank for common values in the table “Table_MarkList”. The following table contains the same marks for “Vimal” & “Nikhil”. After applying Row_Number() function, it is showing them both the rank as “4 & 5”. So, it gives the result as a sequence, one by one,  and it never minds the common values in the “Marks” Column. Now the results are showing it accurately maintaining the Row Number in “Table_MarkList” table.

Row Number In MSSQL

Row Number In MSSQL

Row_Number() Function Sql Query

select Name,Marks, Row_Number() over(order by Marks desc) As 'Row Number' From dbo.Table_MarkList

NTILE()

The important Ranking function in Microsoft SQL Server is NTILE(). We can use this Ranking function for grouping purposes.

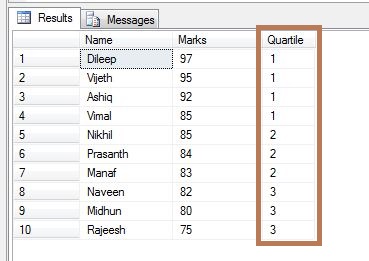
NTILE(3) makes 3 groups and splits the number of row values in  3 equal groups. For example – If there are 9 row values in a table, it will split them into 3 equal row values in a table.

Simple! But what will happen on 10 row values in NTILE(3) ?. It’s so simple. NTILE() will split them too in 3 groups but the first group will have 1 extra row value than the other row values in a table.

Quartile Function In MSSQL

Ntile Function In MSSQL

NTILE() Function Sql Query

select Name,Marks, NTILE(3) over(order by Marks desc) As 'Quartile' From dbo.Table_MarkList

Reference

Ranking Functions (Transact-SQL)

Summary

We learned the types of Ranking functions in Microsoft SQL Server and I hope you liked this article. Please share your valuable suggestions and feedback.

How to resolve “Saving changes is not permitted” Error In Sql


Introduction

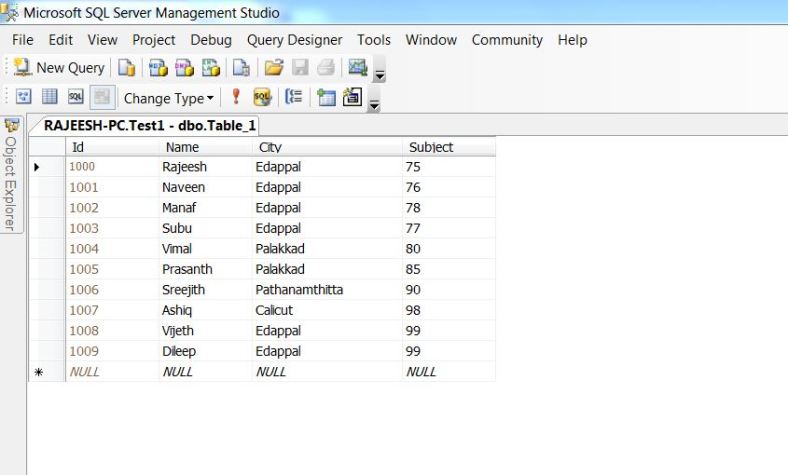
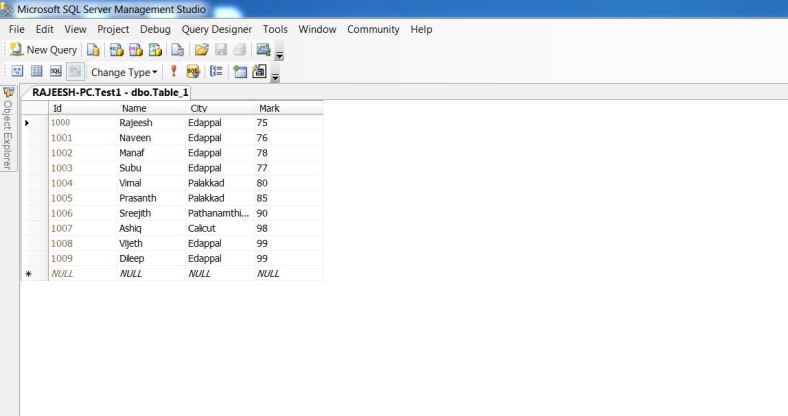
In this article you will learn how to resolve “Saving changes is not permitted” in SQL. The following table  “Table_1” contain the student mark information. I want to change that column name “Subject” to “Mark”.

Step 1 : I have one table “Table_1” and it contain the student mark information.

1

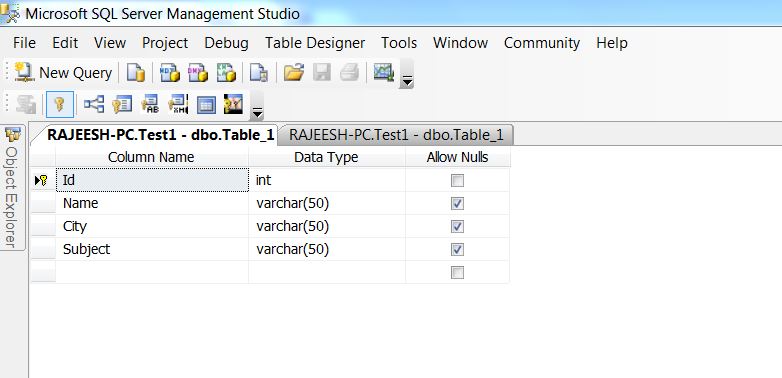
Step 2 : Design View of “Table_1”.

2

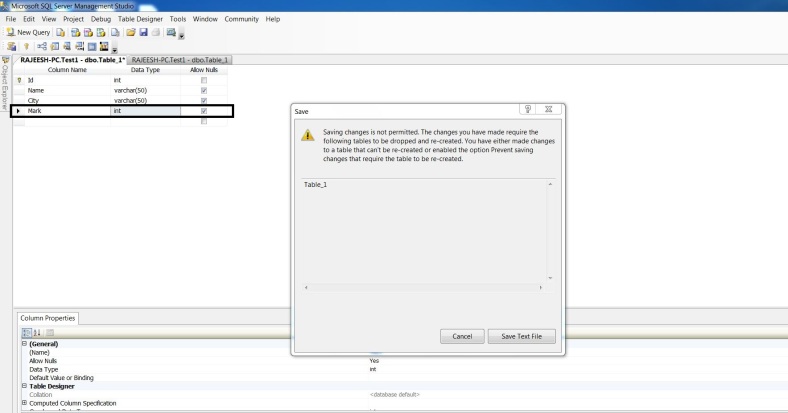
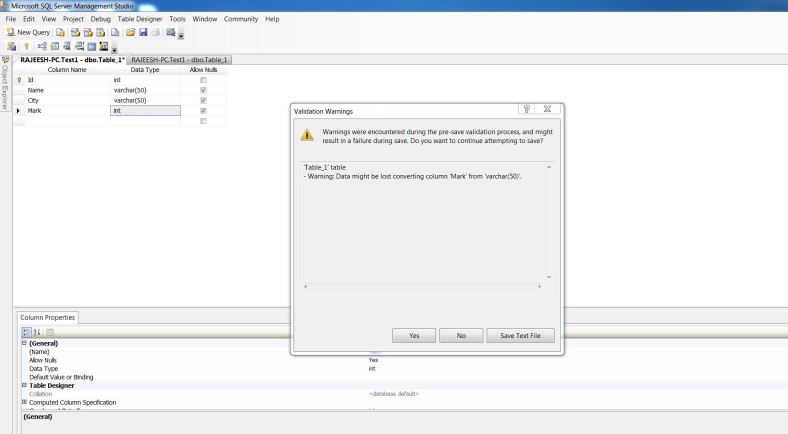
Step 3 : Now I changed the “Subject” name as “Mark” and “varchar(50)” as “int”. It is throwing the exception “Saving changes is not permitted”.

3

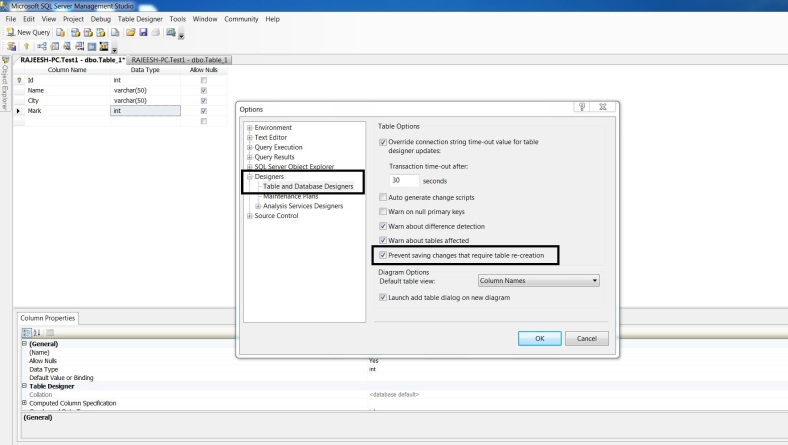
Step 4 : Go to Tools, click Options… , Expand Designers , then click Table and Database Designers,

4

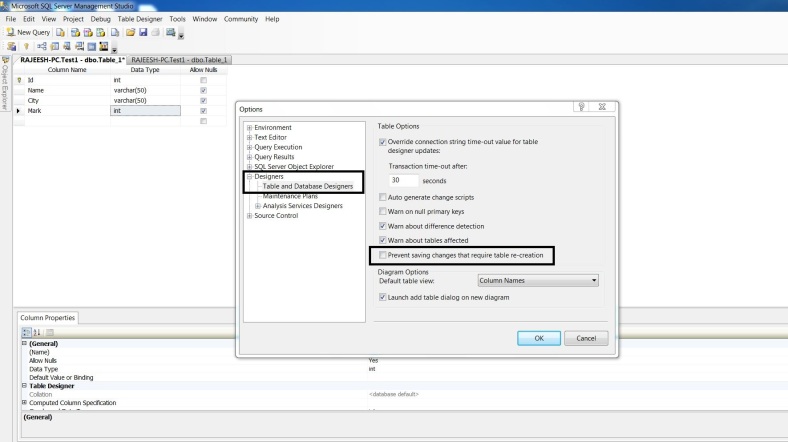
Step 5 : Remove checked in “Prevent saving changes that require table re-creation.” Click Ok.

5

Step 6 : Click Ok.

6

Step 7 : Out Put.

7

Summary

We learned how to resolve “Saving changes is not permitted” in SQL. I hope this article will be useful for beginners.


Copy Or Generate SQL Database Content To Multiple One


Introduction

In this article you will learn how to copy or generate SQL database content to multiple one.

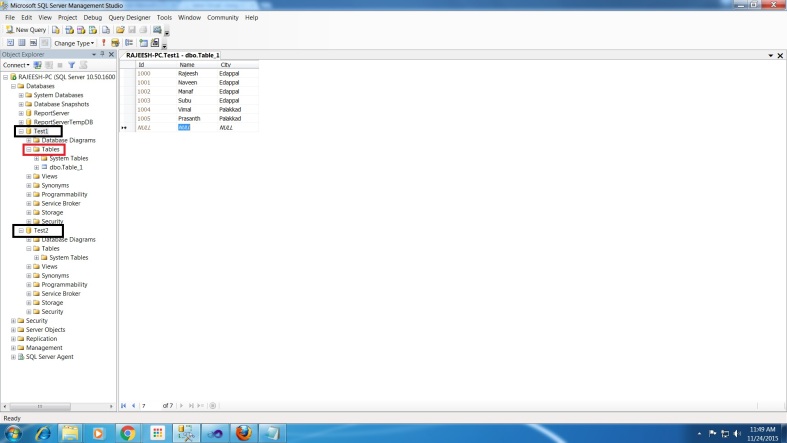
Step 1: I have two database “Test1” & “Test2”. Test2 database is empty,  so we want to copy Test1 database to Test2 based on your requirement like MS SQL Server 2008, 2012, etc.

1

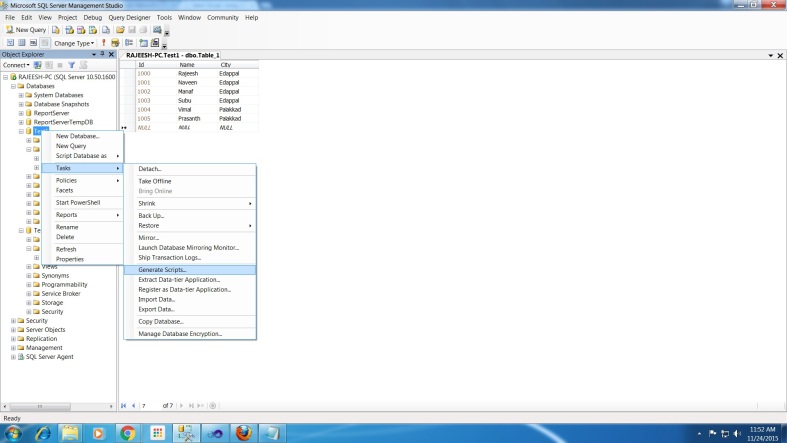
Step 2: Generate the “Test1” database script based on the following steps:

  • Right click “Test1” database.
  • Click Tasks, then Generate Scripts.
2

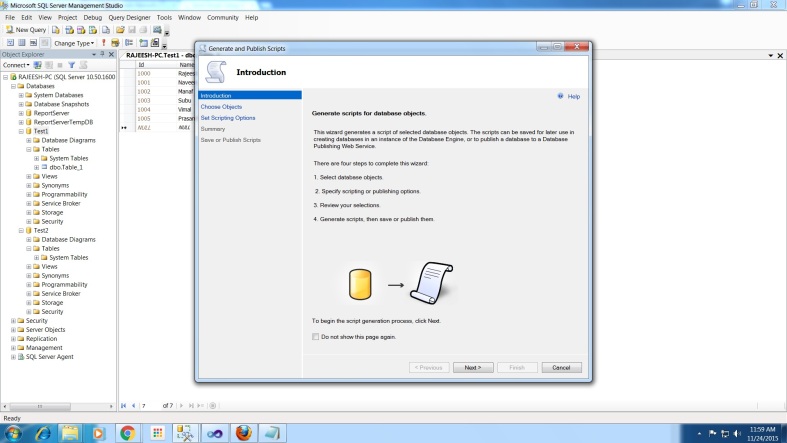
Step 3 : Click Next..

3

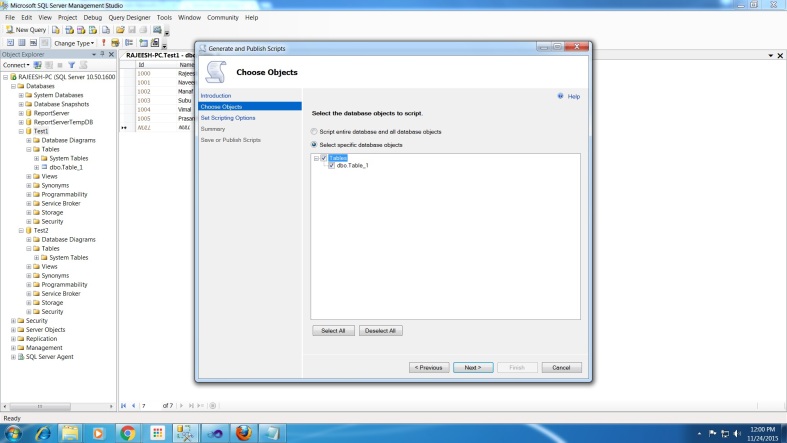
Step 4 : Select “Select specific database objects” and check all the tables present in the database.

4

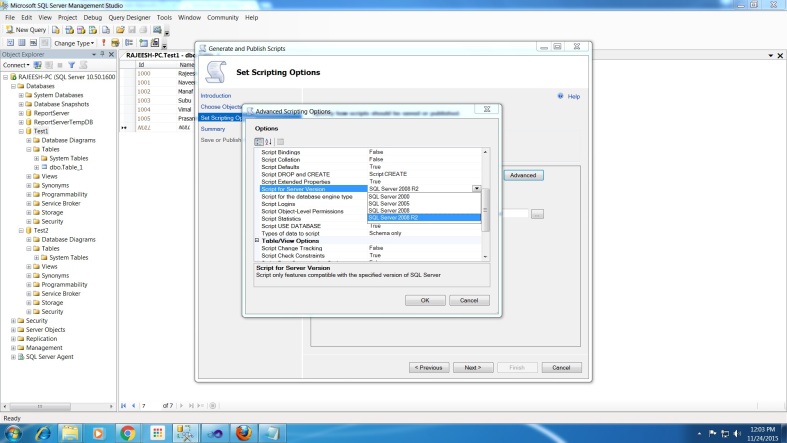
Step 5 : Click “Advanced“, Open New Pop Up Window, General, Script for Server Version, click SQL Server2008 R2 ( Select based on your requirement ).

5

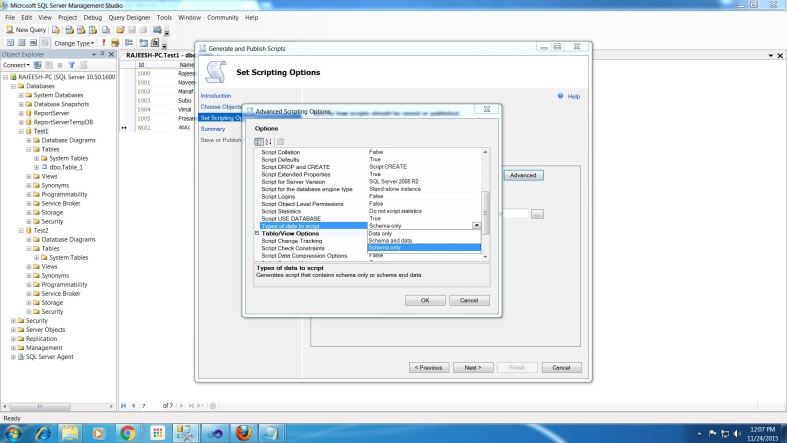
Step 6 : Click “Advanced“, Open New Pop Up Window, General, Types of data to script, then select Schema and data ( Select based on your requirement ).

6

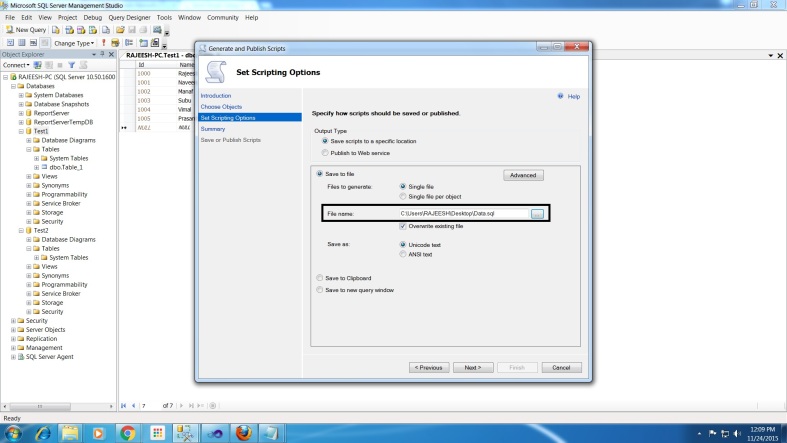
Step 7 : Select the save location for generated script.

7

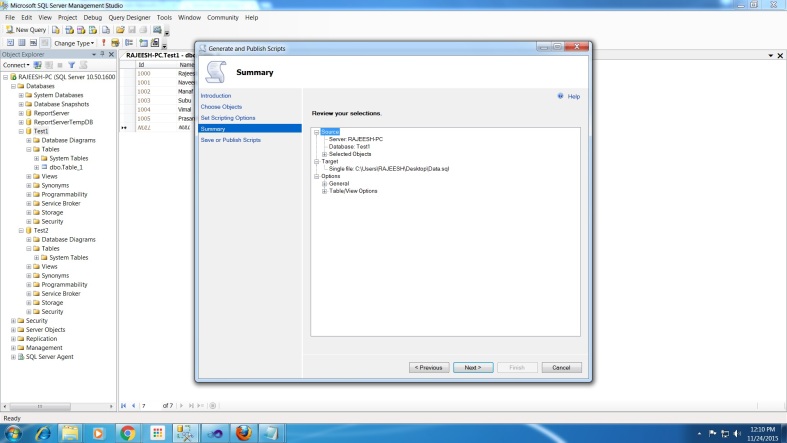
Step 8 : Click Next.

8

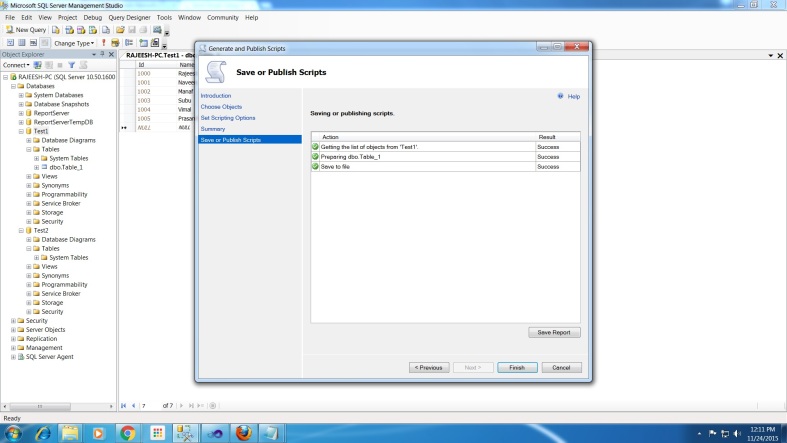
Step 9 : Click Finish.

9

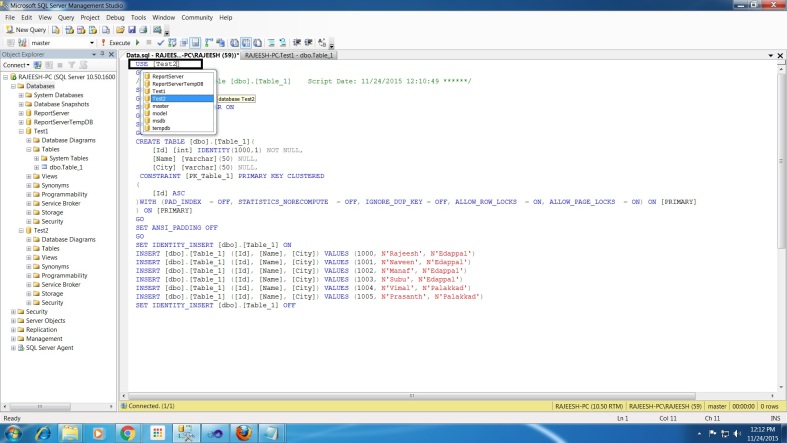
Step 10 : Change database name and update the generated scripts.
10

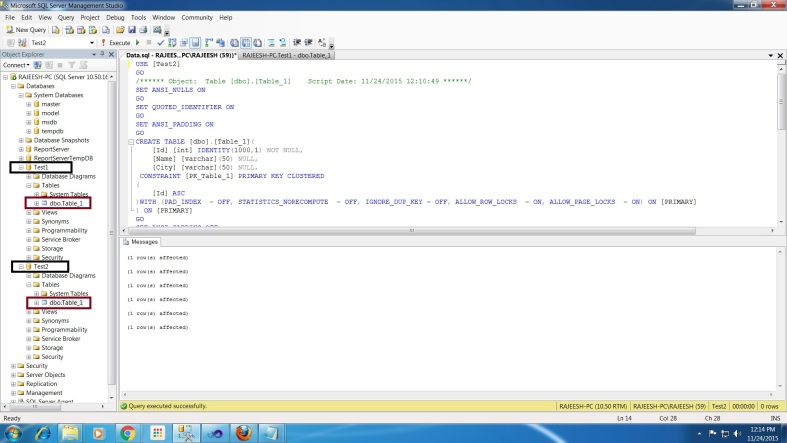
Step 11 : Now copy “Test1” into “Test2”.
11

Summary

We learned how to copy or generate SQL database content to multiple one. I hope this article will be useful for beginners.


Create a Zip File Using Asp.Net & C#


Introduction

In this article I will explain how to create a zip file using ASP.Net & C#. In this purpose we can use Ionic.Zip.dll reference for creating Zip file in ASP.Net.So first we download the dll through this link Ionic.Zip.dll.

Assemblies Required

After downloading the  Ionic.Zip.dll Zip file you can get many folders inside the zip file. Go to zip-v1.9-Reduced folder Inside the zip file. then open the particular folder that contain Ionic.Zip.Reduced.dll.

We must add the following namespace:

using Ionic.Zip;

Code

The following code will create zip file in ASP.Net with the help of  Ionic.Zip.Reduced.dll.

protected void btn_zip_Click(object sender, EventArgs e)
    {
        string path = Server.MapPath("~/Test/");//Location for inside Test Folder
        string[] Filenames = Directory.GetFiles(path);
        using (ZipFile zip = new ZipFile())
        {
            zip.AddFiles(Filenames, "Project");//Zip file inside filename
            zip.Save(@"C:\Users\user\Desktop\Projectzip.zip");//location and name for creating zip file
            
        }
    }
  • Code line number 03 describe the location of the file.Those files we can convert into zip format.
  • Code line number 07 describe that the particular name of the file inside the zip file.
  • Code line number 08 define the name of the zip file we are going to create.

Dll Reference

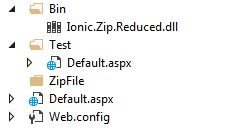
Add the Downloaded dll inside the Bin Folder.

5

Figure 1 : Ionic.Zip.Reduced.dll

Design

3

Figure 2

OutPut

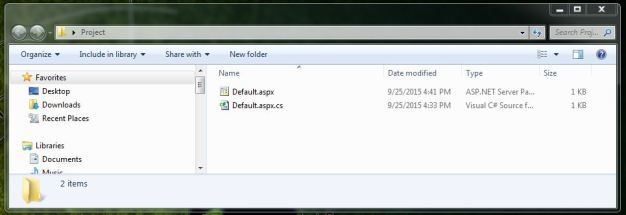
Created the Zip file.

1

Figure 3

Inside The Zip File.

2

Figure 4

Summary

We learned how to create a Zip file using ASP.NET and C#. I hope this article is useful for all .NET beginners.

Send Email To Multiple Email Addresses With Inline Image Using ASP.NET With C#


Introduction

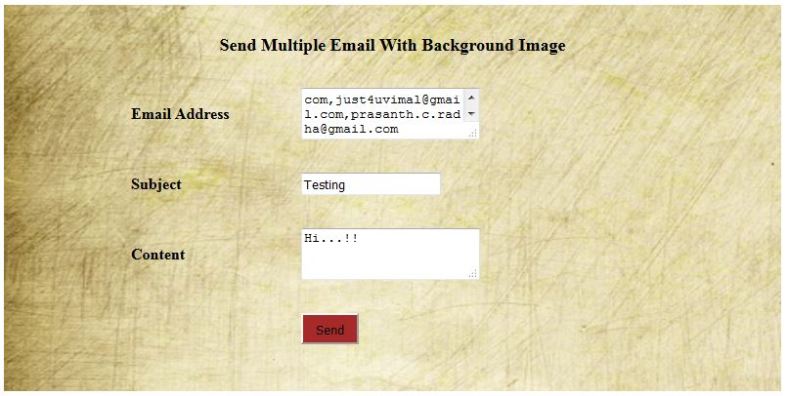
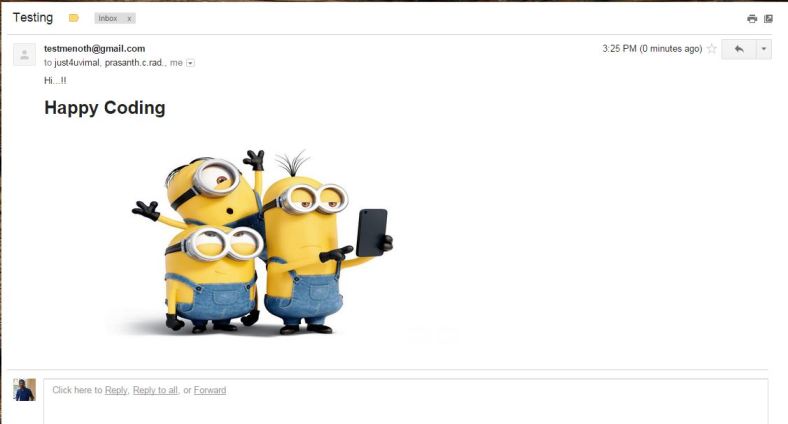
In this article I will explain how to send multiple emails with Inline Image. Before reading this article you must read my previous email related article because I have explained some basics part in my previous article and changed few of the code part in new one. The following are my previous articles.

Code

protected void btn_sendemail_Click(object sender, EventArgs e)
    {
        string to = Txt_toaddress.Text; //To address    
        string from = "fromaddress email"; //From address 
        string[] Multiple = to.Split(',');
        MailMessage message = new MailMessage();
        message.From = new MailAddress(from);

        foreach (string multiple_email in Multiple)
        {
            message.To.Add(new MailAddress(multiple_email));
        }
        
        string mailbody = Txt_Bodycontent.Text + "<br/><html><body><h1>Happy Coding</h1><br><img src=\"cid:Email\"  width='600' height='300'></body></html>";
        AlternateView AlternateView_Html = AlternateView.CreateAlternateViewFromString(mailbody, null, MediaTypeNames.Text.Html);
        // Create a LinkedResource object and set Image location path and Type
        LinkedResource Picture1 = new LinkedResource(Server.MapPath("Selfie.jpeg"), MediaTypeNames.Image.Jpeg);
        Picture1.ContentId = "Email";
        AlternateView_Html.LinkedResources.Add(Picture1);
        message.AlternateViews.Add(AlternateView_Html);

        message.Subject = Txt_Subject.Text;
        message.Body = mailbody;
        message.BodyEncoding = Encoding.UTF8;
        message.IsBodyHtml = true;
        SmtpClient client = new SmtpClient("smtp.gmail.com", 587); //Gmail smtp    
        System.Net.NetworkCredential basicCredential1 = new
        System.Net.NetworkCredential("fromaddress email", "fromaddress password");
        client.EnableSsl = true;
        client.UseDefaultCredentials = false;
        client.Credentials = basicCredential1;
        try
        {
            client.Send(message);
        }

        catch (Exception ex)
        {
            throw ex;
        }
    }

We must add the following namespace:

using System.Net;
using System.Net.Mail;
using System.Text;
using System.IO;
using System.Net.Mime;

Multiple Email

The following code will help to split the Comma ‘”,” separated email in the given textbox ( Txt_toaddress.Text ).

        string to = Txt_toaddress.Text; //To address    
        string from = "fromaddress email"; //From address 
        string[] Multiple = to.Split(',');
        MailMessage message = new MailMessage();
        message.From = new MailAddress(from);

        foreach (string multiple_email in Multiple)
        {
            message.To.Add(new MailAddress(multiple_email));
        }

Inline Image Code

The following code will help to fetch the image and set into the inline of the email body.

        string mailbody = Txt_Bodycontent.Text + "<br/><html><body><h1>Happy Coding</h1><br><img src=\"cid:Email\"  width='600' height='300'></body></html>";
        AlternateView AlternateView_Html = AlternateView.CreateAlternateViewFromString(mailbody, null, MediaTypeNames.Text.Html);
        // Create a LinkedResource object and set Image location path and Type
        LinkedResource Picture1 = new LinkedResource(Server.MapPath("Selfie.jpeg"), MediaTypeNames.Image.Jpeg);
        Picture1.ContentId = "Email";
        AlternateView_Html.LinkedResources.Add(Picture1);
        message.AlternateViews.Add(AlternateView_Html);
        message.Body = mailbody;

Important Notes

  • Firstly, create one string that contain the html body with Inline image. In the above code “mailbody” is the string. It contains the html body.
  • Create an AlternateView object for those supporting the HTML content.
  • System.Net.Mime namespace contain the Image type and html format ( MediaTypeNames.Image.Jpeg & MediaTypeNames.Text.Html ).
  • Create a LinkedResource object for the Inline image to send.
  • Add a LinkedResource object to the AlternateView object.
  • Check the correct Image location otherwise it will throw an error.
  • Give same Image source id and LinkedResource ContentId.Like “<img src=\”cid:Email\” width=’600′ height=’300′>” & Picture1.ContentId = “Email“;

Design

1

Output

2

Common Error for sending an Email

Check the following reference to solve your 5.5.1 Authentication.

Summary

We learned how to send multiple emails with Inline Image using ASP.NET and C#. I hope this article is useful for all .NET beginners.

Replace Function in Microsoft Sql Server


Introduction

Mostly everyone is familiar with C# replace function. In this article I will explain the use of replace function in Microsoft SQL Server. A simple function to replace bulk amount of data in the database. Here I will also give some examples.

Table

My table contains bulk amount of data and some of the values are wrongly entered  into the database. So I want to change those particular values into the table using a single query.

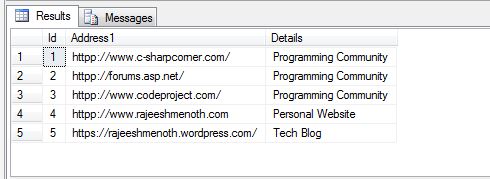
The given table contains incorrect address in the “Address1” column like httpp://www.c-sharpcorner.com/, so http is appended with an extra p (“httpp“). So we can update those values in a single query. How ? Microsoft SQL Server provides Replace function to replace particular data.

1

Sql Query :

The following code will replace that particular data.

update dbo.Tbl_Replace set Address1 = Replace(Address1,'httpp','http')

We can directly use the update method in the above query. Why we are using replace function in SQL?

Because when you are trying to update bulk amount of data you can use the replace function. It will consume the time of update, since you don’t have to update each and every address separately.

update dbo.Tbl_Replace set Address1 = 'http://www.c-sharpcorner.com/' where Id=1  

The above update code only changes the particular Id value.

Example 1

Replace Function

The Sql Replace function replacing “httpp” to “http”.

update dbo.Tbl_Replace set Address1 = Replace(Address1,'httpp','http')  

Output

The Replace function replaced the appended value using a single query.

2

Example 2

Table

How to put space between “BlogContent” like “Blog Content” without affecting whole content in the database.

4

Replace Function

You can use a single space.Like ‘Content’ to ‘ Content’

update dbo.Tbl_Replace set Details = Replace(Details,'Content',' Content') 

Output

5

Summary

We learned how to use a replace function in Microsoft Sql.I hope this article is useful for all .NET programmers.

Auto Save Using AJAX


Introduction

This article explains how to automatically save a value into a SQL database using an ASP.Net WebMethod and jQuery Ajax.

Jquery

The following code shows that SaveDraft.aspx is the aspx page and AutoSave is the method. We pass the client-side value to the server-side using Ajax and WebMethod.

$(document).ready(function () {
 // Configure to save every 5 seconds
 window.setInterval(saveDraft, 5000);//calling saveDraft function for every 5 seconds

 });

 // ajax method
 function saveDraft() {

 $.ajax({
 type: "POST",
 contentType: "application/json; charset=utf-8",
 url: "SaveDraft.aspx/AutoSave",
 data: "{'firstname':'" + document.getElementById('Firstname').value + "','middlename':'" + document.getElementById('Middlename').value + "','lastname':'" + document.getElementById('Lastname').value + "'}",

 success: function (response) {

 }

 });

 }

In the following code the saveDraft function fires every 5 seconds. The value will be saved in the database every 5 seconds without post-backs. Based on our requirements we can change the time interval.

 $(document).ready(function () {
            // Configure to save every 5 seconds
            window.setInterval(saveDraft, 5000);//calling saveDraft function for every 5 seconds

        });

Database structure

Create a table in a database for storing the personal information.The following SQL code contains an existing person’s details. So we can change those values at runtime without a post-back and button-click.

USE [TestDB]
GO
/****** Object:  Table [dbo].[Autosave]    Script Date: 08/07/2015 18:19:54 ******/
SET ANSI_NULLS ON
GO
SET QUOTED_IDENTIFIER ON
GO
CREATE TABLE [dbo].[Autosave](
	[Id] [int] NULL,
	[firstname] [nvarchar](50) NULL,
	[middlename] [nvarchar](50) NULL,
	[lastname] [nvarchar](50) NULL
) ON [PRIMARY]
GO
INSERT [dbo].[Autosave] ([Id], [firstname], [middlename], [lastname]) VALUES (1, N'Rajeesh', N'', N'Menoth')

C# Code

The WebMethod will catch the client-side value in the server side. In the given example I am passing the id directly into the update query. You can modify the code for your requirements.

[WebMethod]
    public static string AutoSave(string firstname, string middlename, string lastname)
    {
        int id = 1;
        string ConnectionString = System.Configuration.ConfigurationManager.ConnectionStrings["TestDb"].ConnectionString;
        SqlConnection con = new SqlConnection(ConnectionString);
        {
            string str = "Update Autosave set firstname='" + firstname + "',middlename= '" + middlename + "',lastname= '" + lastname + "' where Id=" + id + "";
            SqlCommand cmd = new SqlCommand(str, con);
            {
                con.Open();
                cmd.ExecuteNonQuery();
                return "True";
            }
        }

    }

Important Section

1.Namespace

The given namespace contains the WebMethod,database connection libraries.

using System.Web.Services;
using System.Data.SqlClient;

2.Reference

Add the following jQuery reference.

<script type="text/javascript" src="http://ajax.googleapis.com/ajax/libs/jquery/1.4.2/jquery.min.js"></script>
<script type="text/javascript" src="http://ajax.googleapis.com/ajax/libs/jqueryui/1.8.1/jquery-ui.min.js"></script>
pic1

Figure 1

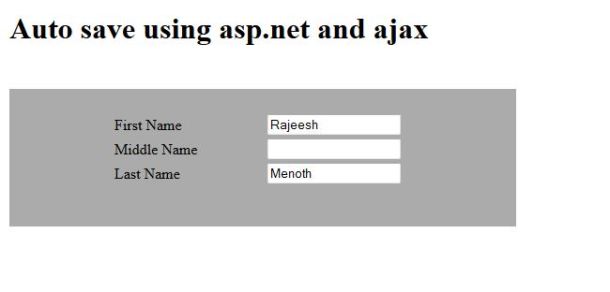
Output

pic2

Figure 2

Summary

We learned how to automatically save a value into a SQL database using ASP.Net WebMethod and jQuery Ajax. I hope this article is useful for all .NET beginners.

“Login failed for user” C# with SQLConnection


This is the Common Problem we are facing in Server DB Connection in Asp.net.If you are using windows authentication to connect to the Server DB, you need to set “Trusted_Connection=True;” if you are using SQL server authentication, you need to declare User “Id=myUsername; Password=myPassword;”

Code Snippet In Web.Config:

Windows authentication

<add name="windowsConnection" connectionString="Server=localhost; Database=databasename; Trusted_Connection=True;" />

SQL server authentication

<add name="Sqlserverconnection" connectionstring="server=localhost; Database=databasename;uid=db; password=123 "/>